In This Section
- Home
- About
- Support
- DMIS – User Manual - 2019
- DMIS – How to View DSS Information
- DMIS - Virtual App
- Support & Login
- Getting Started
- Overview
- Maintain Department Preferences
- Setting up Module Structure
- Module Structure – Mark X Weight
- Virtual App DMIS Mark Entering/Import
- Entering Placement Judgements
- Recording Student Absences
- Recording Students who FAIL a SPECIAL REQUIREMENT
- Break code on a module
- Upload Module Marks to ITS
- Virtual App Report Download
- Common Support Queries
- Support & Login
- ITS
- Reporting Services
- DMIS Login on Virtual App
- Student Headcount Summary
- Contact
- ITS Upgrade v4.1 - Feb 2023
- Reporting Services
Module Structure Options
There are 2 methods to set up a Module Structure. If you can use option 1 as outlined below, this is a very straight forward option that is quick and easy to complete.
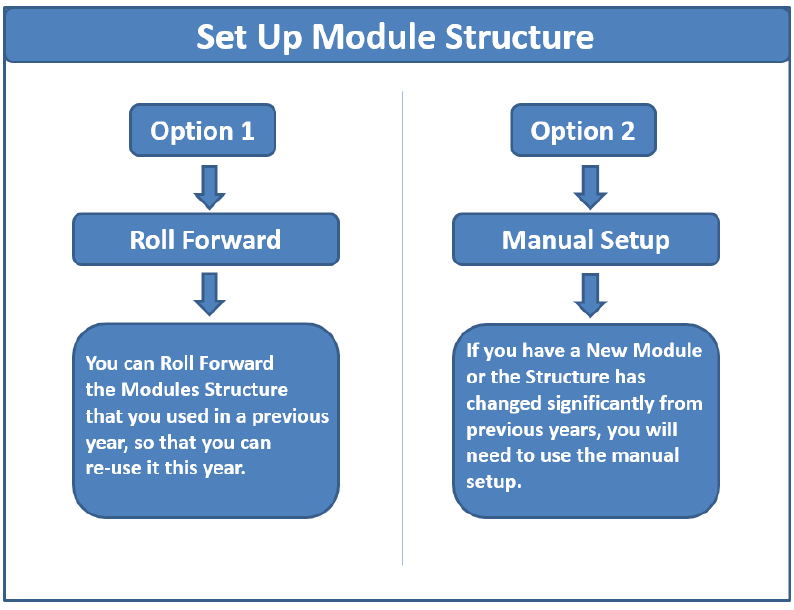
Go to – Option 1 – Roll ForwardGo to – Option 2 – Manual Setup
Setup Module Structure – Option 1 – Roll Forward
- This option allows the user to roll forward the module details from one exam period to another.
- All elements that are setup for the source academic year and the source exam month will be created for the new target academic year and target exam month.
- A list of modules that are already created on ITS for the source and target academic year including exam month will be displayed if the academic structure has been setup on DMIS.
- The option is only available to Department Administrators OR Module Coordinators.
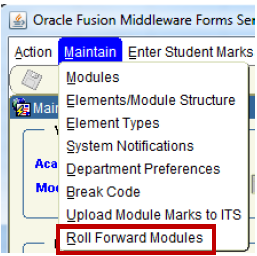
- This option is available under Maintain>Roll Forward Modules.
- When this option is selected the following window is displayed:
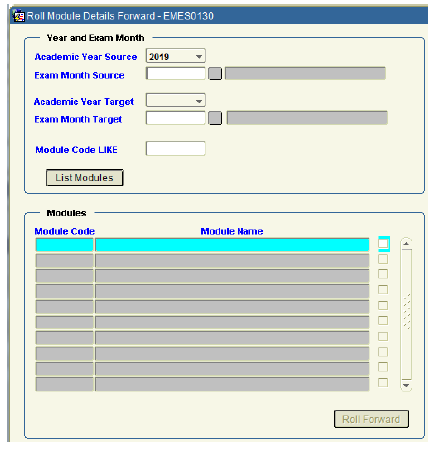
- Step 1: The user must select an Academic Year Source. This is the academic year that the module details are being copied from. The academic year is in the format 2019 (= 2018 /2019). If the user has set the academic year session default in the Welcome Screen then this value will be automatically populated.
- Step 2: Enter/Select a valid Exam Month Source. This is the exam month that the module details are being copied from.
- Step 3: The user must select an Academic Year Target. This is the academic year that the module details are being . The academic year is in the format 2004 (= 03 /04).
- Step 4: Enter/Select a valid Exam Month Target. This is the exam month that the module details are being copied to.
- Step 5: Enter the full or part of the Module code and click on the ‘List Modules’ button.
 The list of modules is then displayed as follows;
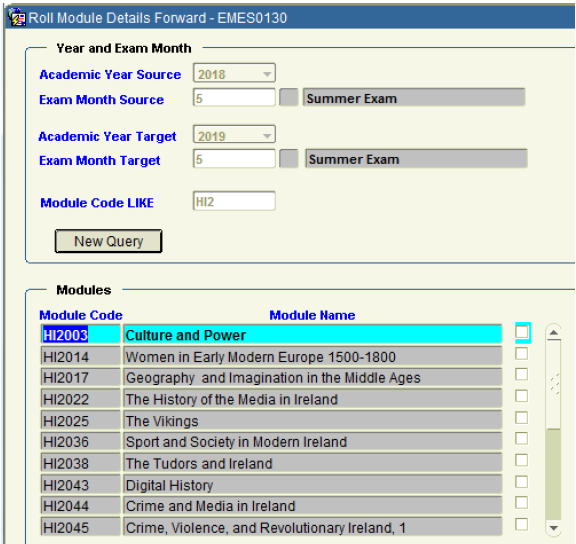
- Step 6: Click the check box to select which modules you wish to roll forward.
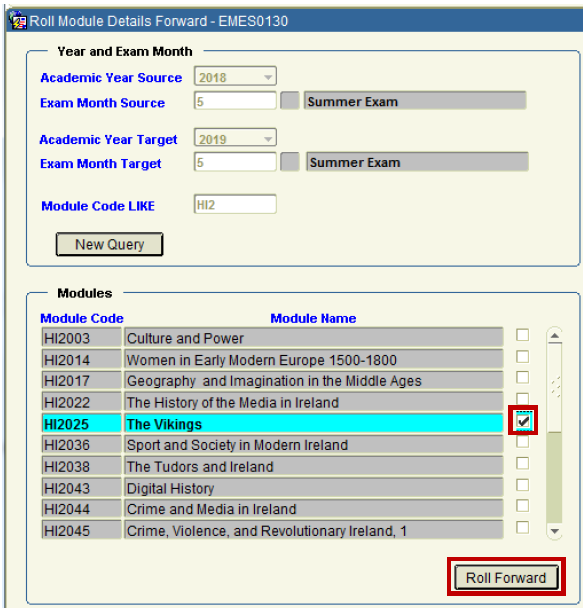
- Step 7: Click on the ‘Roll Forward’ button to roll forward the module details to the target academic year and target exam month.
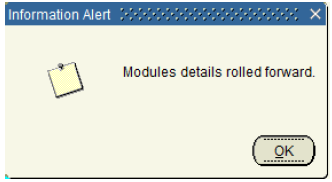
- On successful roll forward of the Module Structure, you will be presented with the following confirmation message:
Roll Forward Modules Screen - Field descriptions
- Academic Year Source:
The academic year to be selected where the module details will be copied from. - Exam Month Source:
The exam month to be selected where the module details will be copied from. - Academic Year Target:
The academic year to be selected where the module details will be copied to. - Exam Month Target:
The exam month to be selected where the module details will be copied to. - Module Code LIKE:
The module code to be selected by the user. Can be a Partial Code Module Code or a Complete Module Code. - List Modules/New Query:
This button will toggle between List Modules when there are no modules displayed to New Query to allow the user to enter new criteria. - Module Code:
Displays the module code. - Module Name:
Displays the module name. - Check box:
Selecting the checkbox indicates that the user wishes to roll forward the details of the selected module.
Setup Module Structure – Option 2 – Manual Setup
- This option allows the user to create/update the module structure. The module structure refers to the various elements/papers that make up the module.
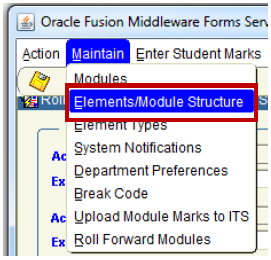
- This option is available under Maintain> Elements/Module Structure.
- The Maintain Elements/Module Structure screen is displayed as follows:
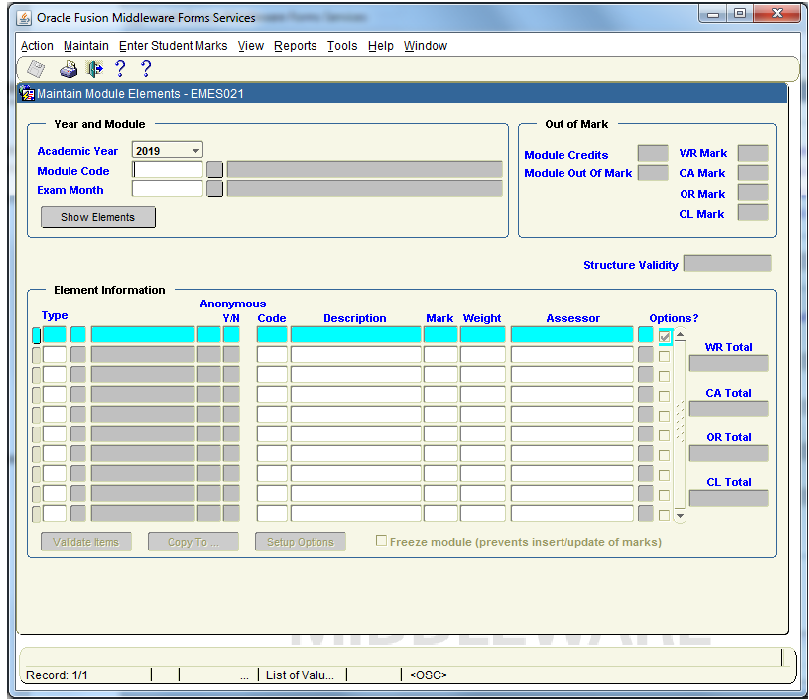
- Step 1: The user must select an Academic Year. The academic year is in the format 2019 (= 2018 /2019). If the user has set the academic year session default on the Welcome Screen then this value will be automatically populated.
- Step 2: Enter/Select a valid Module Code. The user must enter a valid module code or select a module code from the list of values (LOV). The user can only select module codes that they have the security setting to select. For example a department administrator will be able to select any module code that is delivered by their department (as defined by ITS).
- Step 3: Enter/Select a valid Exam Board Month.
- Example of Steps 1, 2 & 3:
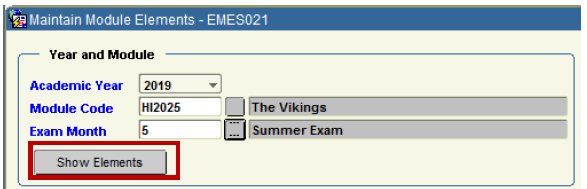
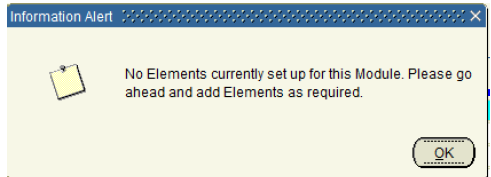
- Step 4: Click ‘Show Elements’ Button. If there are no elements currently setup for the combination selected then a message is displayed indicating that no elements exist and that the user can go ahead and setup elements.
- Step 4: (Continued). Click ‘Show Elements’ Button. If there are any elements already setup then they are displayed.
Example: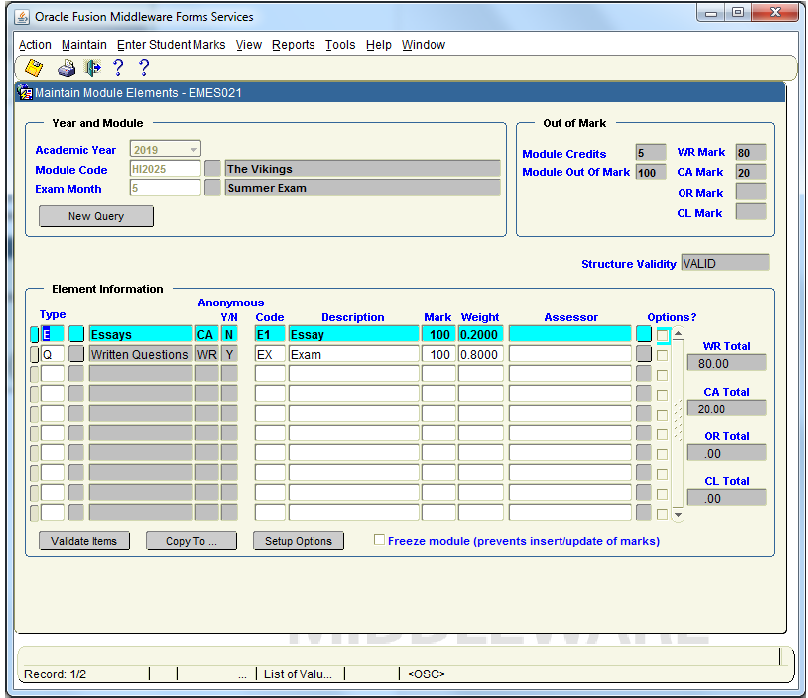
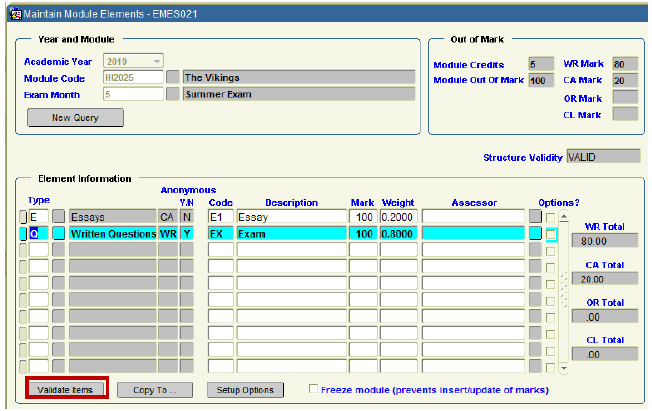
- To illustrate how a Module Structure is manually setup, I am going to use Module HI2025 as per below screenshot.
- For demonstration purposes, I have removed the 2 Elements in the HI2025 Structure, and will rebuild then from the start.
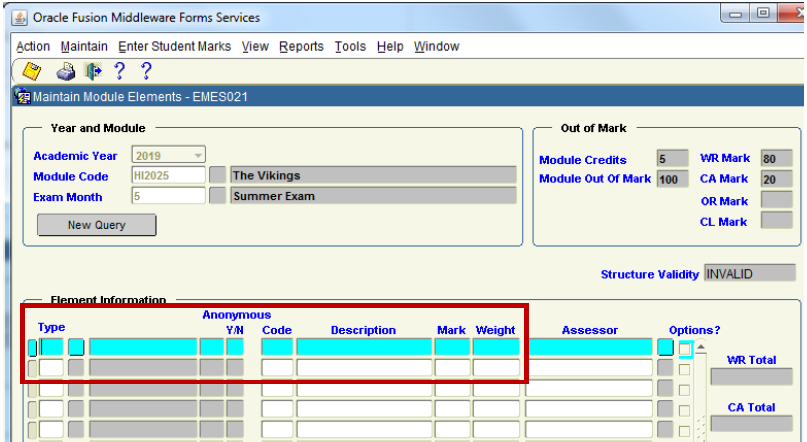
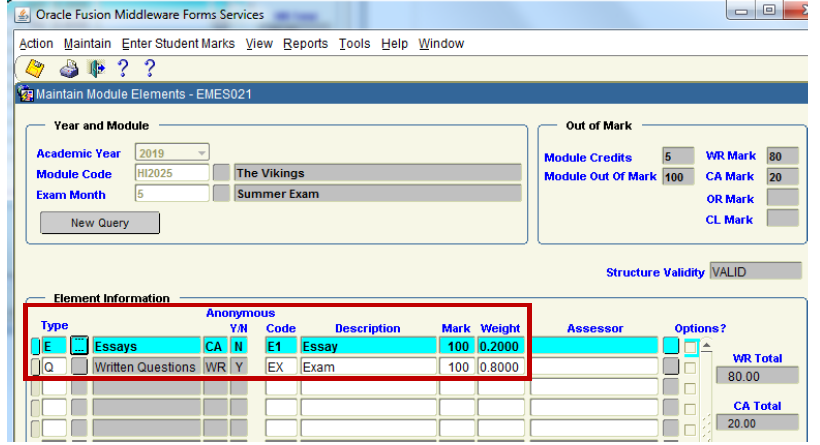
- Step 5: Select the Element Type by clicking on the small square box to the right of the Type Field.
The Element Type value is very important, as it automatically populates if the element is WR, CA, OL or CL. The Element Type will also automatically populate the Anonymous Y/N flag on each Element entry.
Using the HI2025 example, I want to first of all re-create the ESSAYS Element.

- When I click on the small square box as highlighted above, I get presented with a List of Valid Element Types. I scroll down the list where I locate and select ESSAYS.
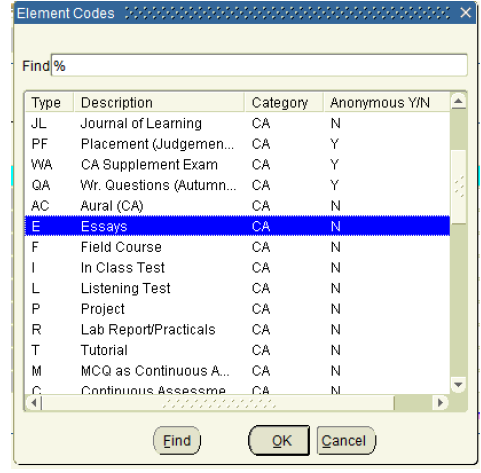
- Note that the ESSAYS option is automatically classified as a CA (Continuous Assessment) and Anonymous = N.
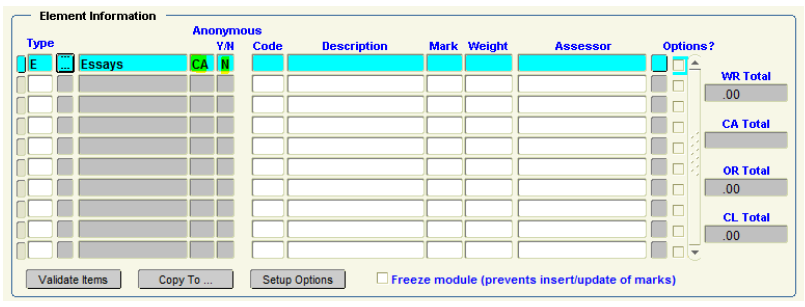
- Once I clicked OK to the ESSAYS Element Structure, the list of possible Elements disappeared, and the ESSAYS information of CA and Anonymous = N is automatically recorded on screen.
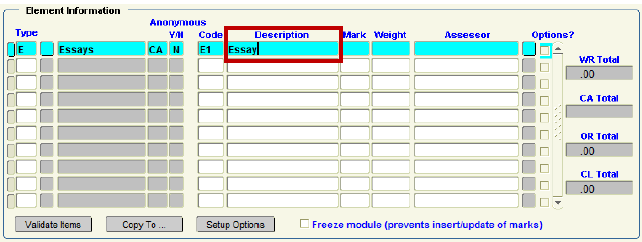
- Step 6: Enter Element Code.
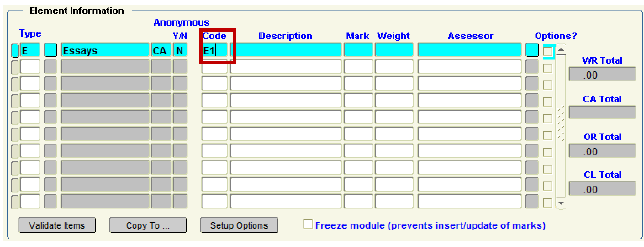
- This is a free text field that is used to uniquely identify the element. It is recommended that some naming convention be used to ensure that elements will appear on various reports in an order that makes sense to the user.
- Step 7: Enter a Description for the element. This is a free text field.
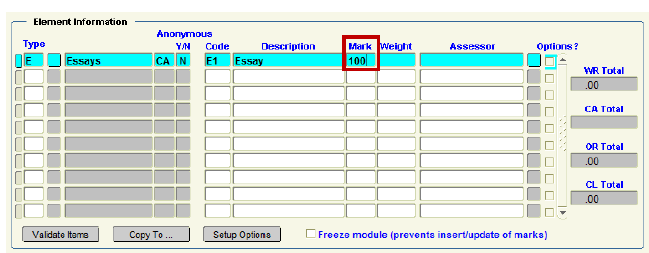
- Step 8: Enter Mark. This is the out of mark for the element.
- Step 9: Enter Element Weight. This is the weight value that is to be applied to the specific element. When the Weight is entered, DMIS will automatically calculate the Mark X Weight and will populate the appropriate WR / CA / OR / OL element total field on the right hand side of the screen.
i.e.: 100 x 0.2000 = 20.00 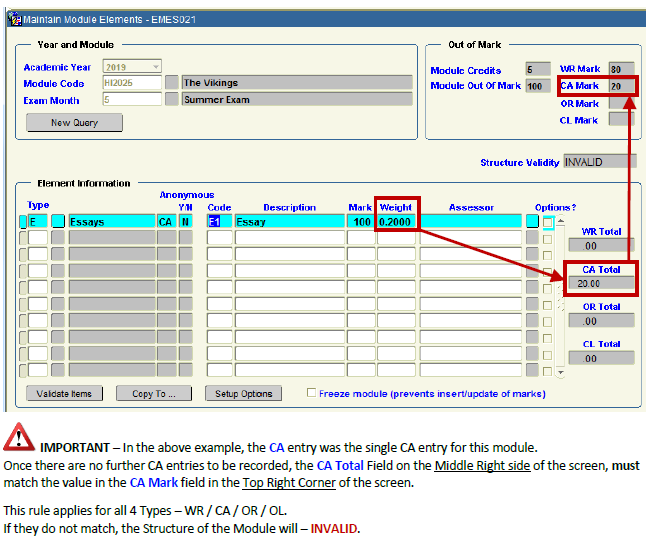
- Step 10: Repeat Steps 5 – 9 for any additional Elements Structures in the Module.
Example: I added in a second Element for the Written Exam.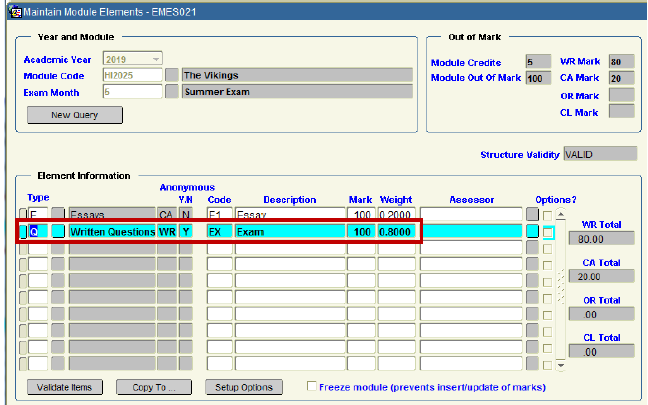
- The Exam Mark x Weight is 100 x 0.8000 = 80.
As the WR = 80 + the CA = 20, this is a Total = 100.
This 100 Total matches the value in the ‘Module out Of Mark’ field.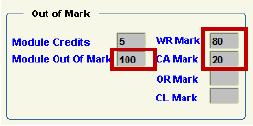
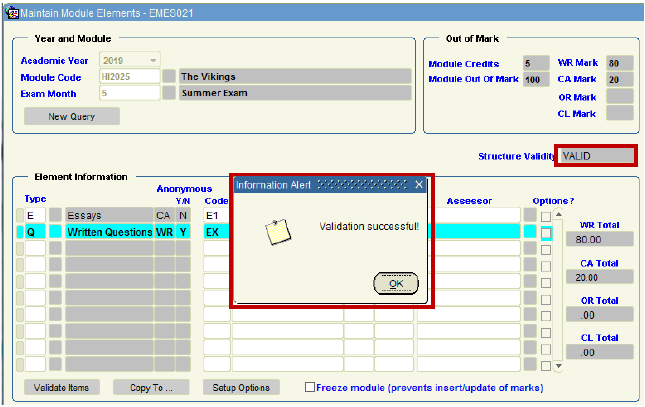
- Step 11: The Module Element Structure MUST be validated. To Validate the Structure, click the Validate Items button on the lower left side of the screen.
- On successful Validation, a message is presented to state this. Also the Structure Validity field value will = VALID.
- Step 12: Final Action is to Save the Structure:

Academic Systems Administration Office
Contact us
2nd Floor, West Wing, Main Quadrangle, University College Cork (UCC), Western Road, Cork