In This Section
- Home
- About
- Support
- DMIS – User Manual - 2019
- DMIS – How to View DSS Information
- DMIS - Virtual App
- Support & Login
- Getting Started
- Overview
- Maintain Department Preferences
- Setting up Module Structure
- Module Structure – Mark X Weight
- Virtual App DMIS Mark Entering/Import
- Entering Placement Judgements
- Recording Student Absences
- Recording Students who FAIL a SPECIAL REQUIREMENT
- Break code on a module
- Upload Module Marks to ITS
- Virtual App Report Download
- Common Support Queries
- Support & Login
- ITS
- Reporting Services
- DMIS Login on Virtual App
- Student Headcount Summary
- Contact
- ITS Upgrade v4.1 - Feb 2023
- Reporting Services
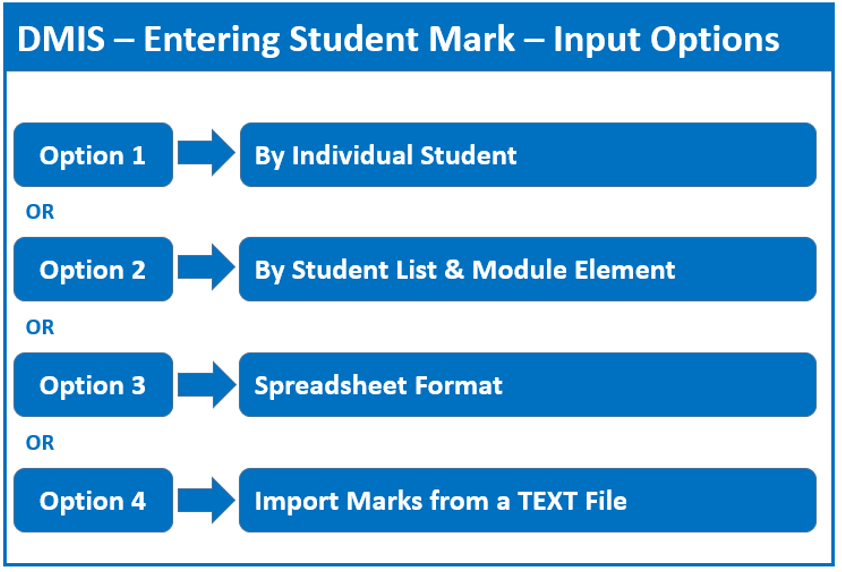
Entering Student Marks – Options
- Once your module structure is setup, the next step is to Enter Marks.
- There are 4 options for recording Student Marks.
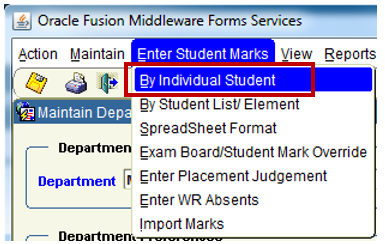
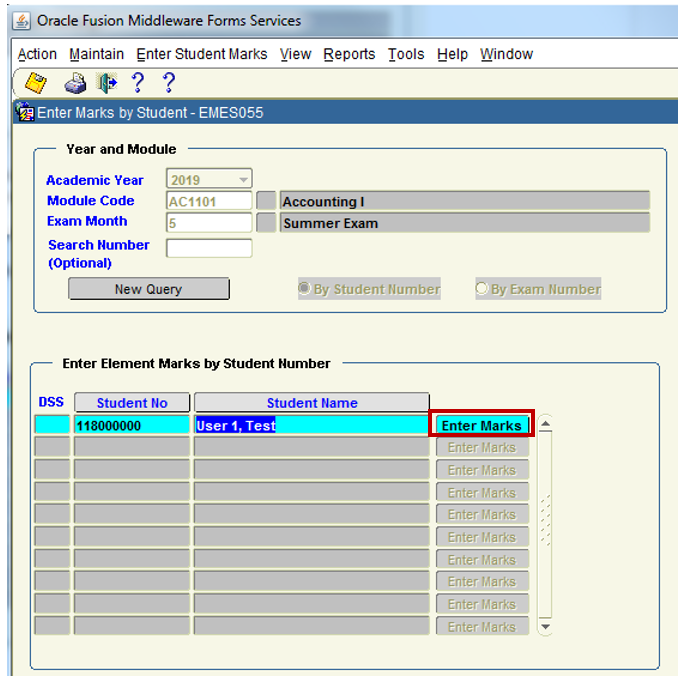
Entering Student Marks – By Individual Student
Step 1- Select the Menu – Enter Student Marks – By Individual Student:
Step 2 - Enter the Academic Year, Module Code and Exam Month.
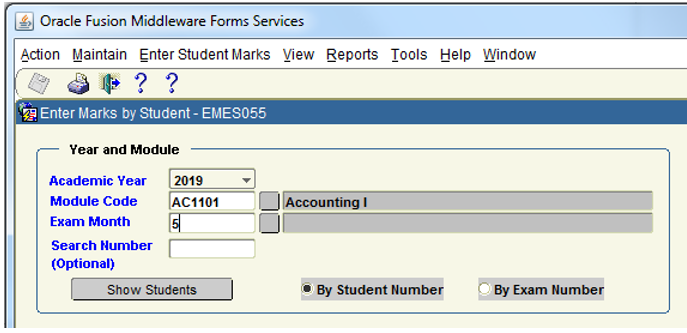
Step 3 - ‘By Student Number’ is the auto-selected option.
If you are entering Marks by Exam Number, please select ‘By Exam Number’
Step 4 – Click the Show Students Button.
All Students who are registered for the specified Year + Module + Exam Month, are presented on screen.
Example:
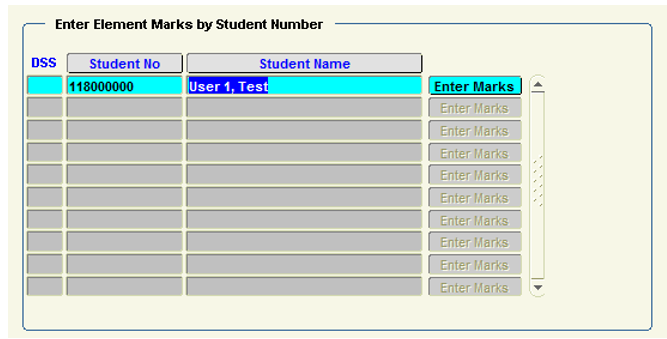
Step 5 – Highlight the student that you want to enter marks for, and click the ‘Enter Marks’ button.
Each of the Module Elements that were setup in the Module Structure are now presented for the Student.
Example – Essay and Written Exam.
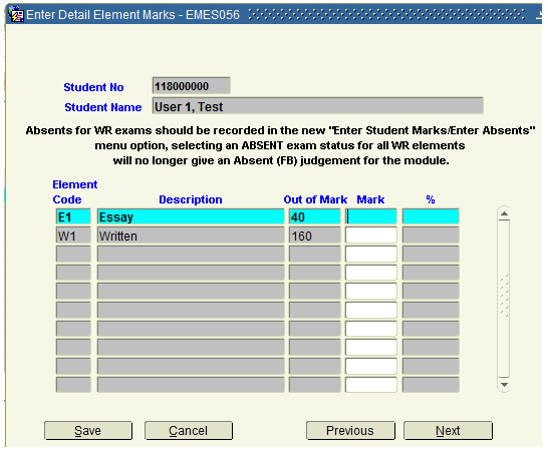
Step 6 – In the MARK Field - Enter the Mark that the Student obtained in each of the Module Elements.
Note that when you tab out of the MARK field, the % values to the right of the MARK field, will be automatically calculated and populated for you.
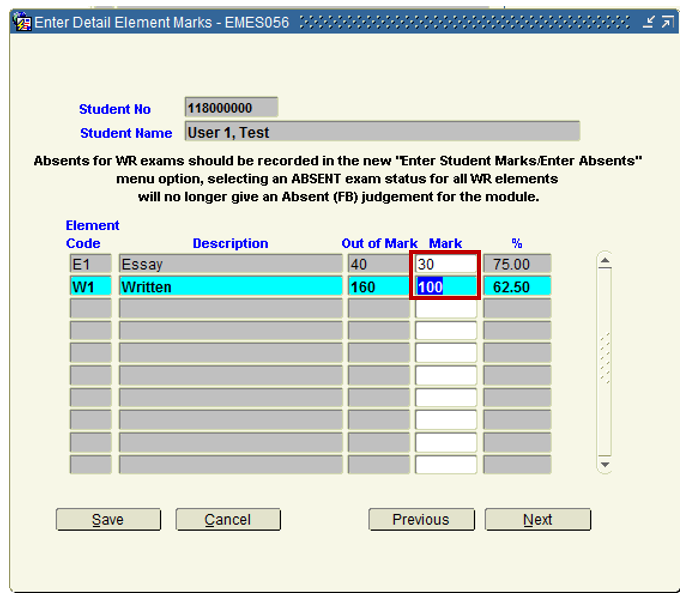
Step 7 – Click the SAVE Button to save the MARKS that have been entered.
Entering Student Marks – By Student List & Module Element
- This option allows the user to enter student marks for a particular element for the whole class.
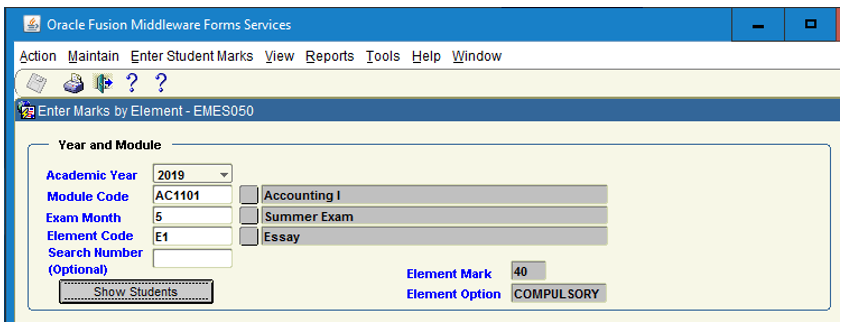
Step 1- Select the Menu – Enter Student Marks – By Student List / Element:

Step 2 - Enter the Academic Year, Module Code and Exam Month.
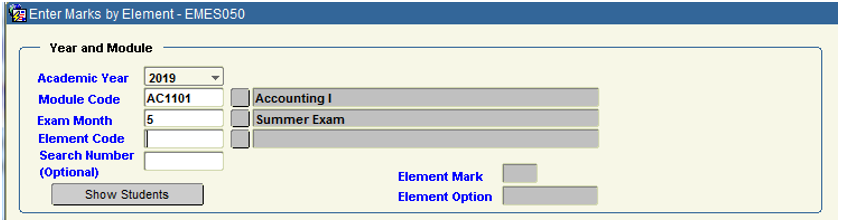
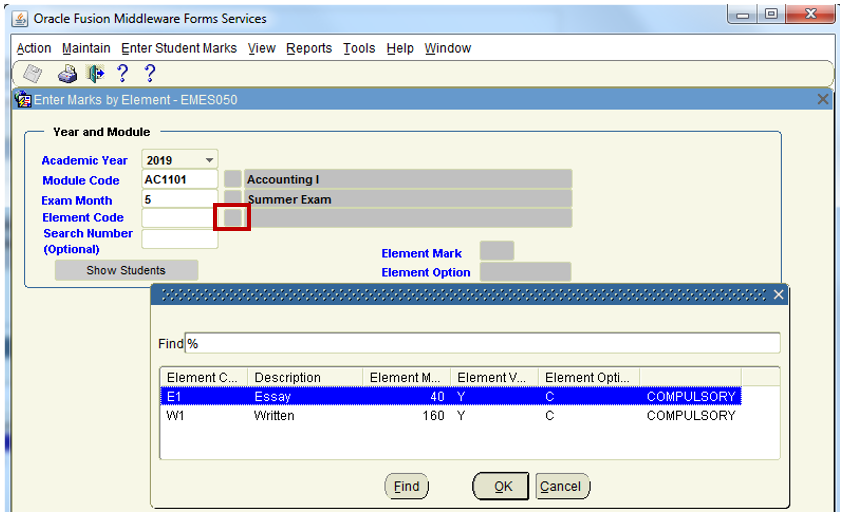
Step 3 – Click on the Element Code button to the right of the Element Code field.
Step 4 - Select the Element that you want to enter Marks for, and click the OK Button.
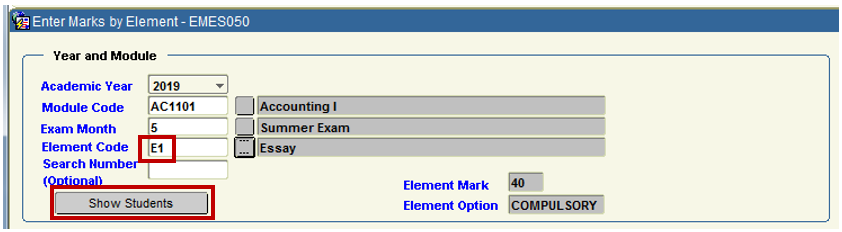
Step 5 – Once the Element Code field is populated, click the Show Students Button.
 Step 6 – Highlight the Student that you want to enter Marks for.
Step 7 – Enter the Mark Value. Once you Tab Out of the Mark Field, the % Value will automatically populate.
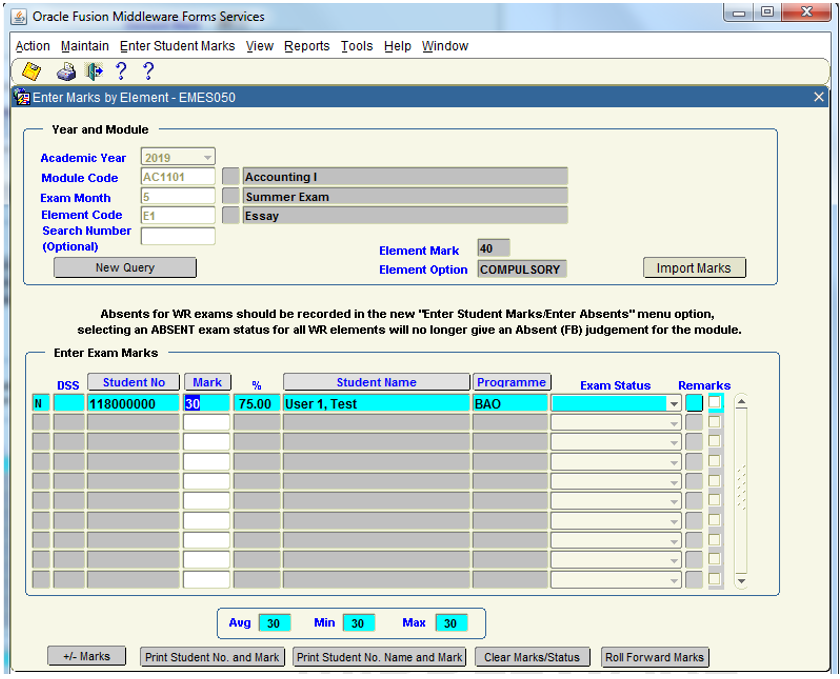
Step 8 – Save your changes by clicking the SAVE Icon in the top left corner of the screen.
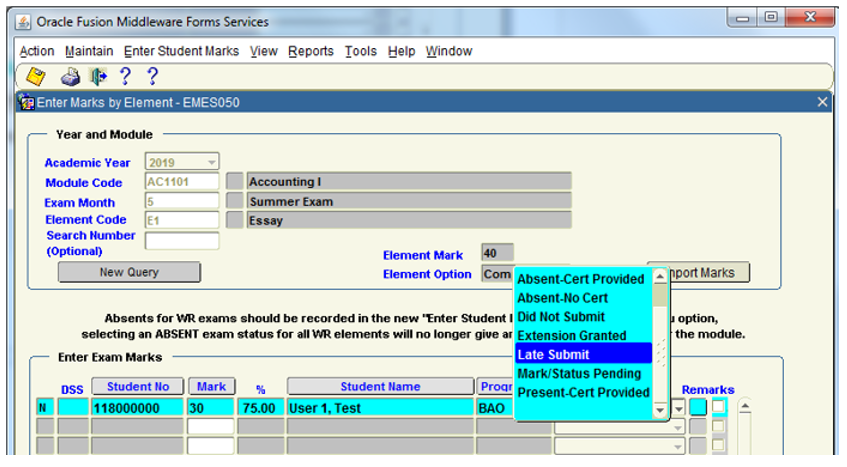
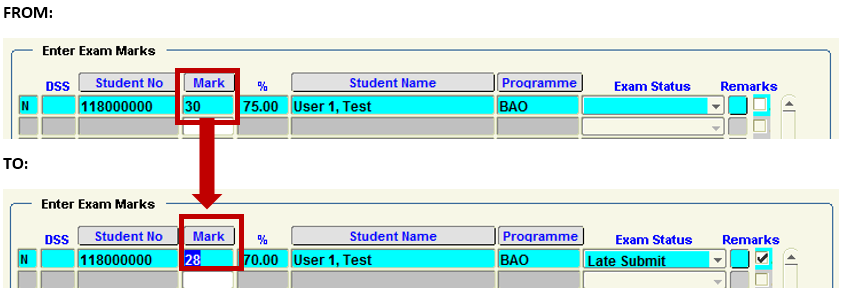
EXAM STATUS:
- The Exam Status field provides a dropdown list of values that can be recorded for a Mark Entry.

The list of options available are as follows:
- Absent
- Absent – Cert Pending
- Absent – Cert Provided
- Absent – No Cert
- Did Not Submit
- Extension Granted
- Late Submit
- Mark/Status Pending
- Present – Cert Provided
Example:
If an Essay was submitted late by a Student, this scenario can be recorded in DMIS.
REMARKS:
- The Remarks Option provides the user with a Text Box where Remarks / Notes can be added for the Mark Entry on a student by student basis.

- By clicking the small square button under Remarks, the Add Remarks Screen is presented.
A Remark can be added to this Text Box. - Once you have saved your changes on Screen, there will be a Tick in the Remarks section for that Student.
Example: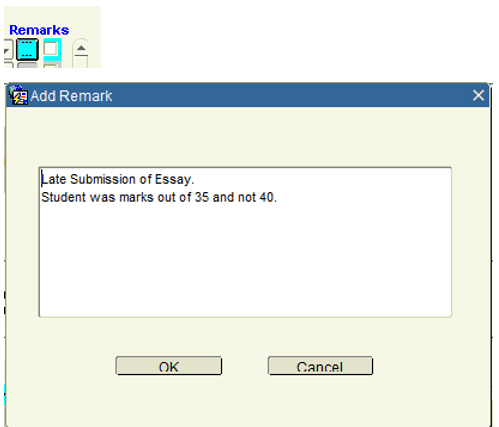
PLUS / MINUS MARKS:
- At the end of the By Student List / Element Screen, there are a set of buttons.
- The 1st button is the + / - Marks:

- This option lets the DMIS user Increase or Decrease the Marks OR Percent for ALL THE STUDENTS in the Module.
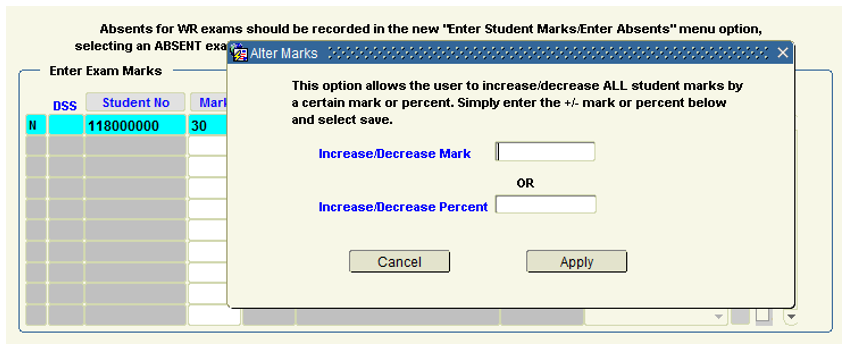
Example 1 – Increase Mark:
If I wanted to Increase the Mark of ALL STUDENTS in the Module by 2 Marks, I enter ‘2’ and click Apply.
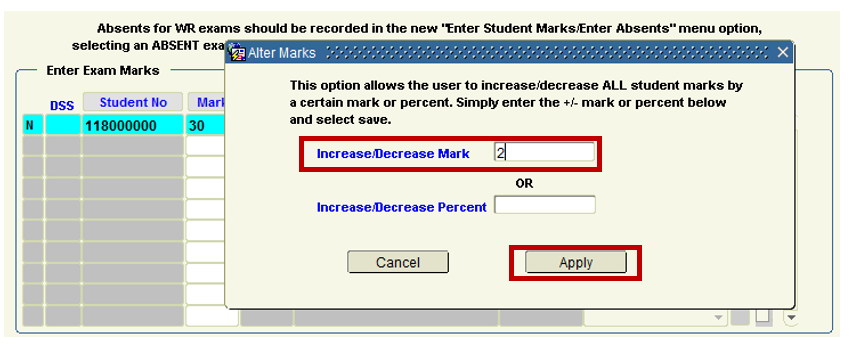
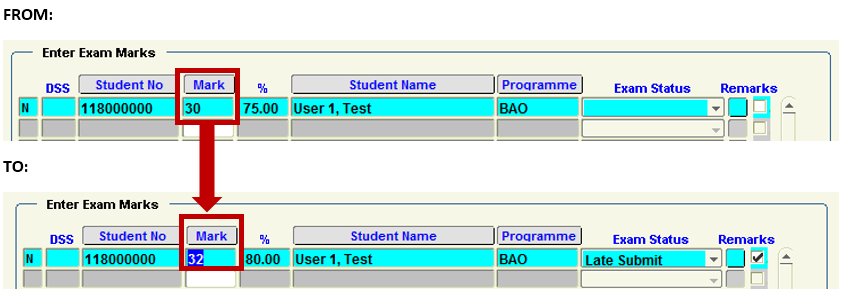
A Mark Increase of ‘2’ gets applied to ALL STUDENTS in the Module.
The % value is also automatically increased accordingly.
Example 2 – Decrease Mark:
If I wanted to Decrease the Mark of ALL STUDENTS in the Module by 2 Marks, I enter ‘-2’ and click Apply.

A Mark Decrease of ‘-2’ gets applied to ALL STUDENTS in the Module.
The % value is also automatically decreased accordingly.
Example:
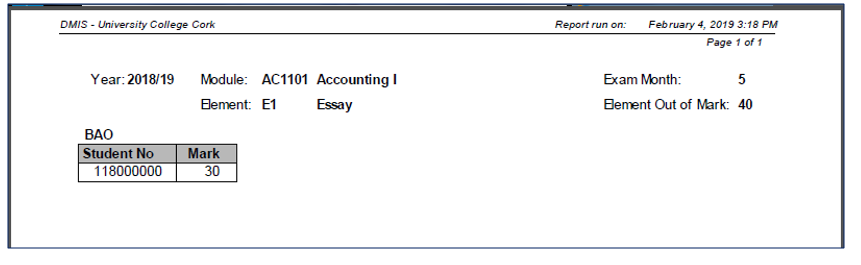
PRINT STUDENT NUMBER AND MARK:
- The 2nd button is the Print Student No. and Mark:
- At the end of the By Student List / Element Screen, there are a set of buttons.

- This option allows the user to produce a report with Student Number, Mark, Module and Element Information:
Example:
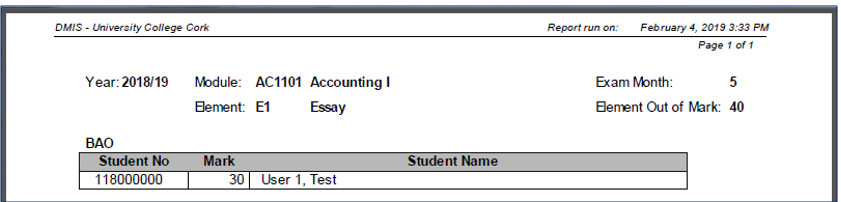
PRINT STUDENT NUMBER NAME AND MARK:
- At the end of the By Student List / Element Screen, there are a set of buttons.
- The 3rd button is the Print Student No. and Mark:

- This option allows the user to produce a report with Student Number, Mark, Module and Element Information:
CLEAR MARKS / STATUS:
- At the end of the By Student List / Element Screen, there are a set of buttons.
- The 4th button is the Clear Marks / Status:

- In the event of an error with Mark Entry which impacts the entire Student List, you can use this button to Clear ALL the Marks that have been entered.
Example:
![]()
- Make sure you Save your Changes before leaving the screen.

ROLL FORWARD MARKS:
- At the end of the By Student List / Element Screen, there are a set of buttons.
- The 5th button is the Roll Forward:

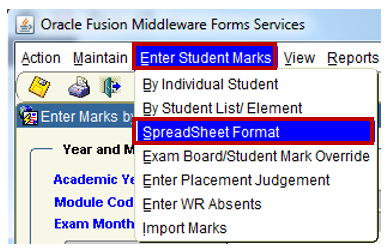
Entering Student Marks – By Spreadsheet Format
- This option allows the user to enter student marks for ALL module elements for the whole class.
Step 1- Select the Menu – Enter Student Marks – Spreadsheet Format:
Step 2- Enter the Academic Year + Module Code + Exam Month, and click Show Students.
Example: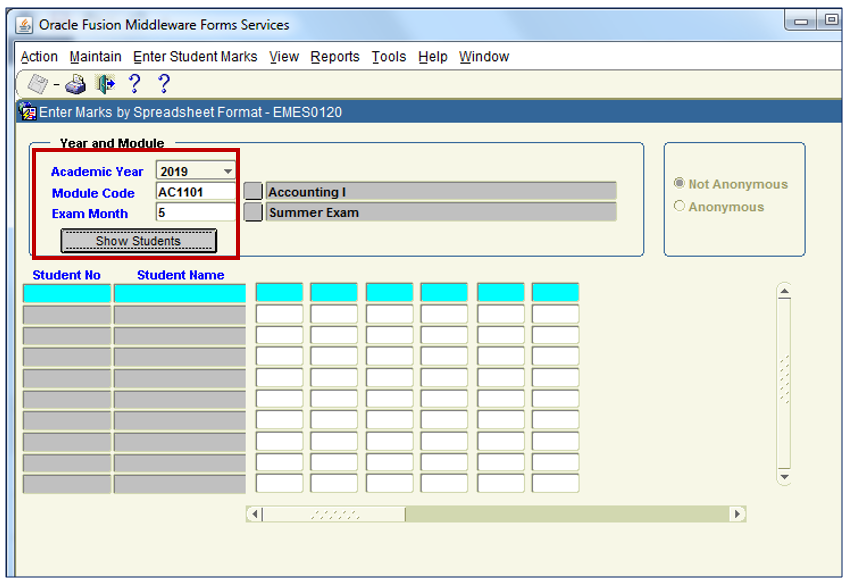
Step 3 – The Format of the Screen will change, and you will be presented with the Element Codes that you setup in your Module Element Structure.
Example:
2019 – AC1101 – Month 5 – Has 2 Elements (1) E1 – Essay (2) W1 – Written.
Step 4 – Enter the Student Mark Element results, and Save your changes.
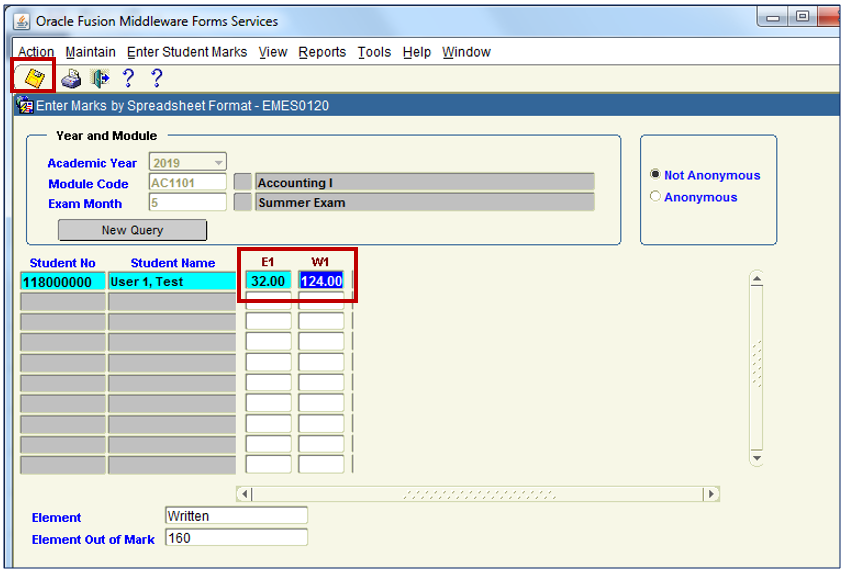
Result - Your Marks are now saved on DMIS.
NOT ANONYMOUS vs ANONYMOUS Elements:
- The Not Anonymous and Anonymous selection options in the top right hand corner of the screen are important.
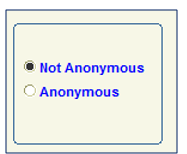
I.e. – If the Module Element Structure contains Anonymous Elements, then the option to enter the Marks for the Anonymous Elements will only be displayed once you click the Anonymous option.
Example:
The following module structure contains 2 Anonymous elements (1) EX – Exam (2) WR - Exam
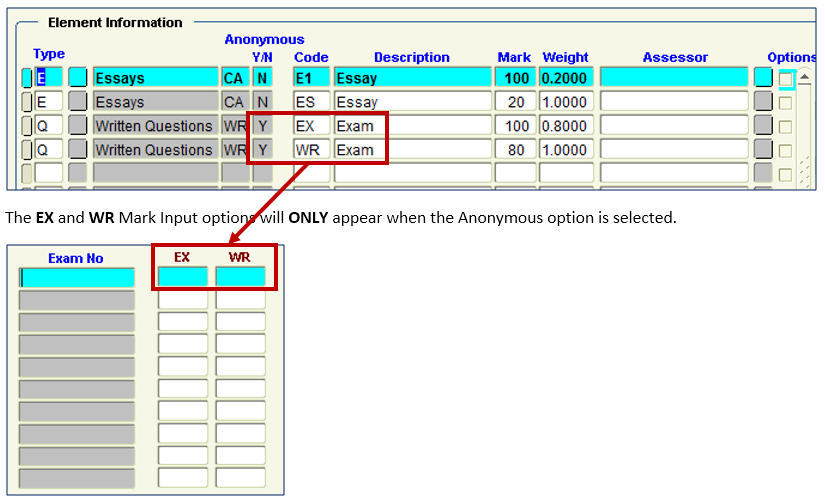
- All Anonymous Module Elements will require the Marks to be Input against an EXAM Number.
- All Non - Anonymous Module Elements will require the Marks to be Input against a Student Number.
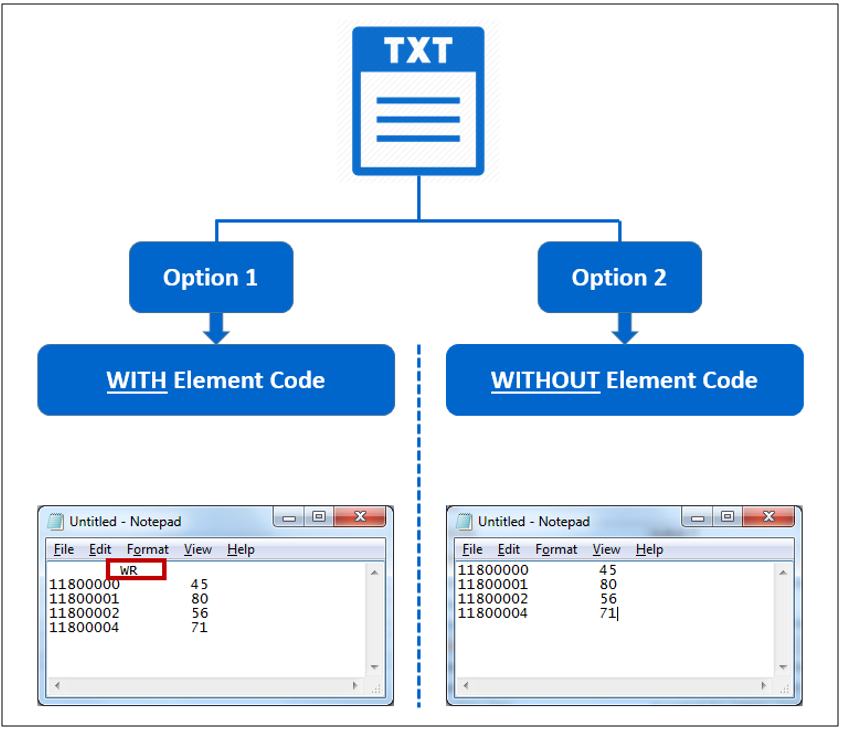
Entering Student Marks – Import Marks from a TEXT File
-
There are 2 options for how a Mark TEXT File is constructed:
-
Having The Element Code IN or NOT IN the Mark TEXT File is important, as it determines which DMIS Screen you must use for Uploading the File.
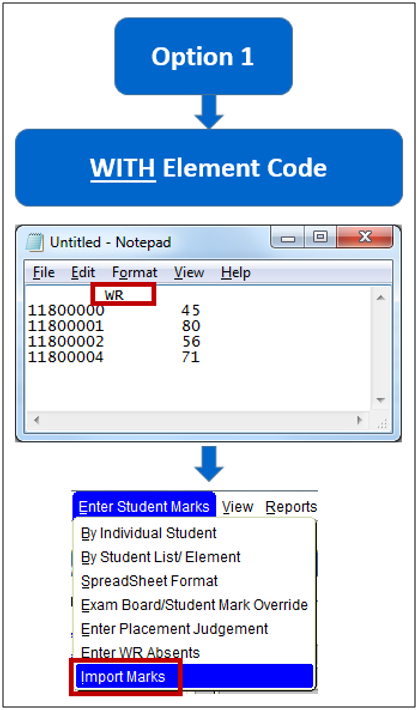
- Option 1 – WITH Element Code – Must use the IMPORT MARKS Screen.
- Having The Element Code IN or NOT IN the Mark TEXT File is important, as it determines which DMIS Screen you must use for Uploading the File.
- There are 2 options for how a Mark TEXT File is constructed:
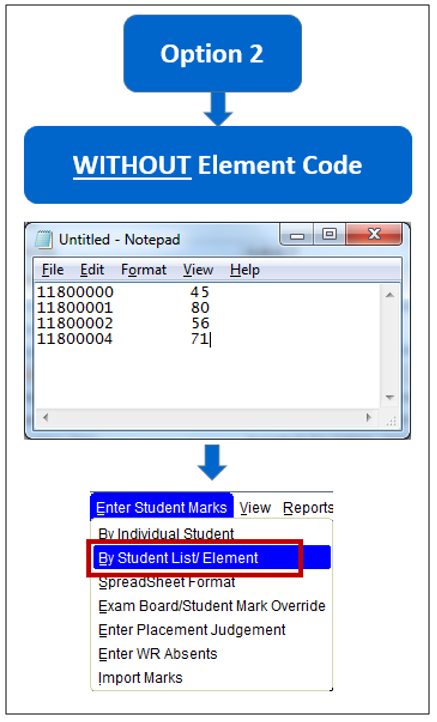
- Option 2 – WITHOUT Element Code – Must use the BY STUDENT LIST / ELEMENT Screen
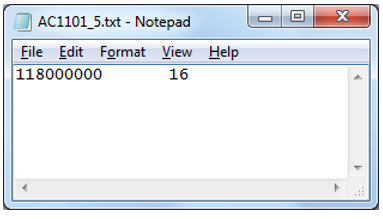
- OPTION 1 – WITH ELEMENT CODE:
- The structure of the Mark TEXT File is very straight forward
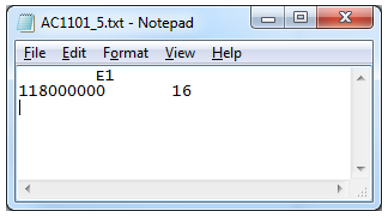
- Format:
- Line 1 – Tab in 1 Space.
- Line 1 – Type the Element Code.
- Line 2 – Type the Student Number
- Line 2 – Tab in 1 Space.
- Line 2 – Type the Result Value
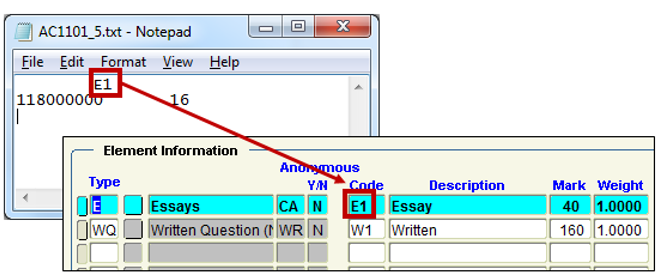
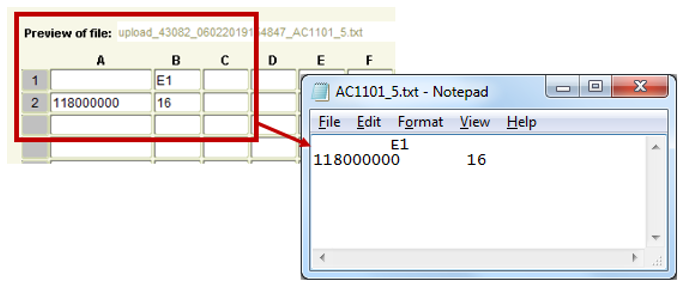
- NB - The Element Code must match the Element Code that is in the Module Element Structure.Example:
- Save your file on OneDrive on Office 365.
- Once your file is created and ready to be Imported into DMIS, go to Enter Student Marks – Import Marks.
- Enter the Academic Year + Module Code + Exam Month, and click the Import Button.

- Enter the Academic Year + Module Code + Exam Month, and click the Import Button.
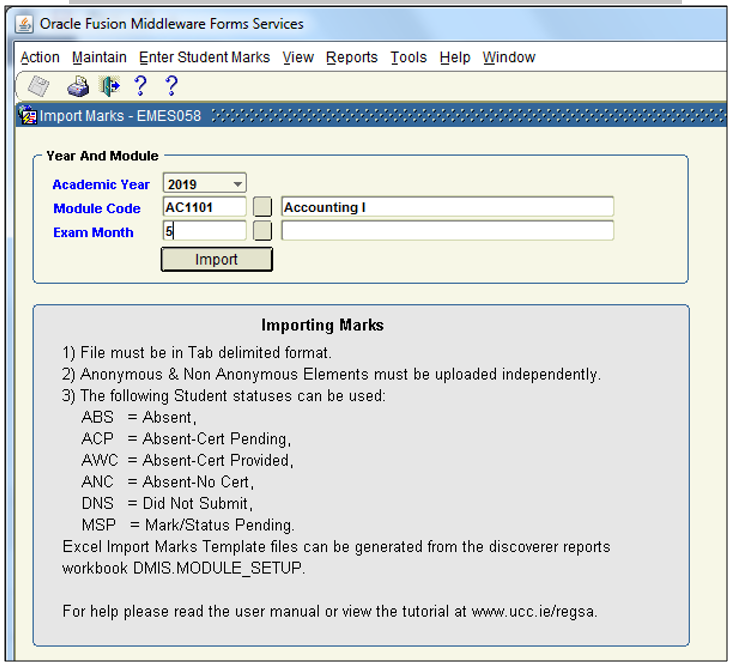
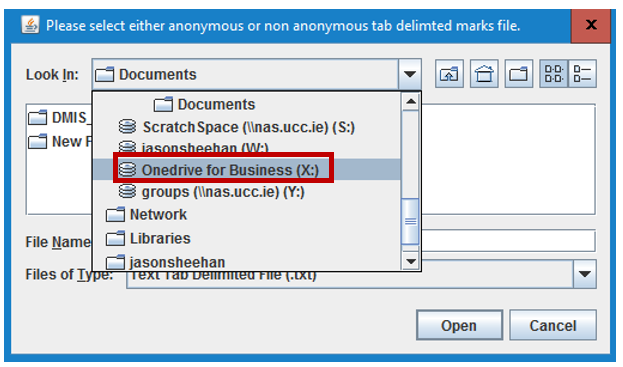
- Select Onedrive for Business, locate your file, and click Open to Upload.
- Upon successful upload of the Mark File, the following DMIS Screen will be presented to you.
The top part of the screen provides a summary of the Elements to be imported.
The bottom part of the screen provides a summary / preview of the file data that will be imported into ITS.
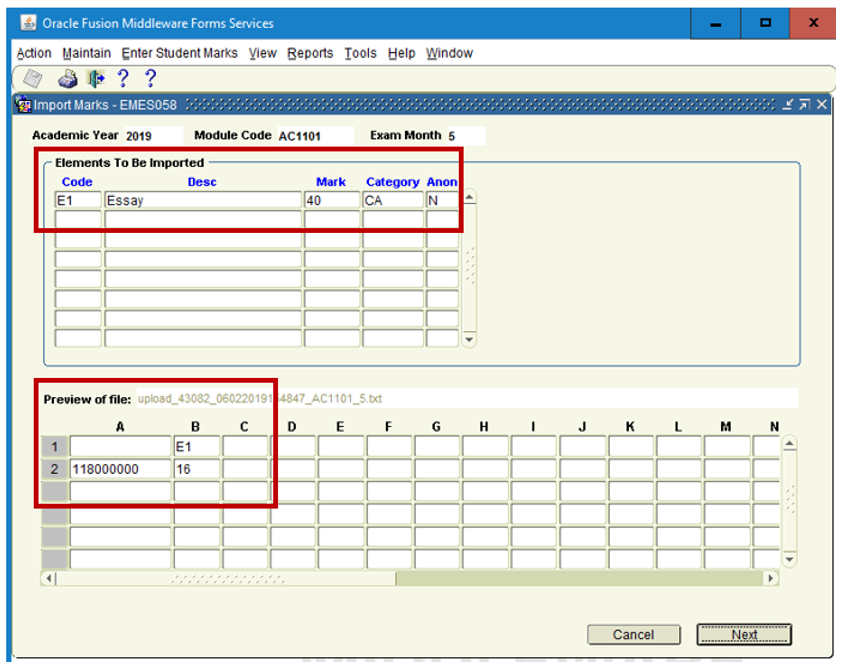
- The ‘Preview of file’ section would match exactly to the data in your Mark File:
- Click the NEXT Button.
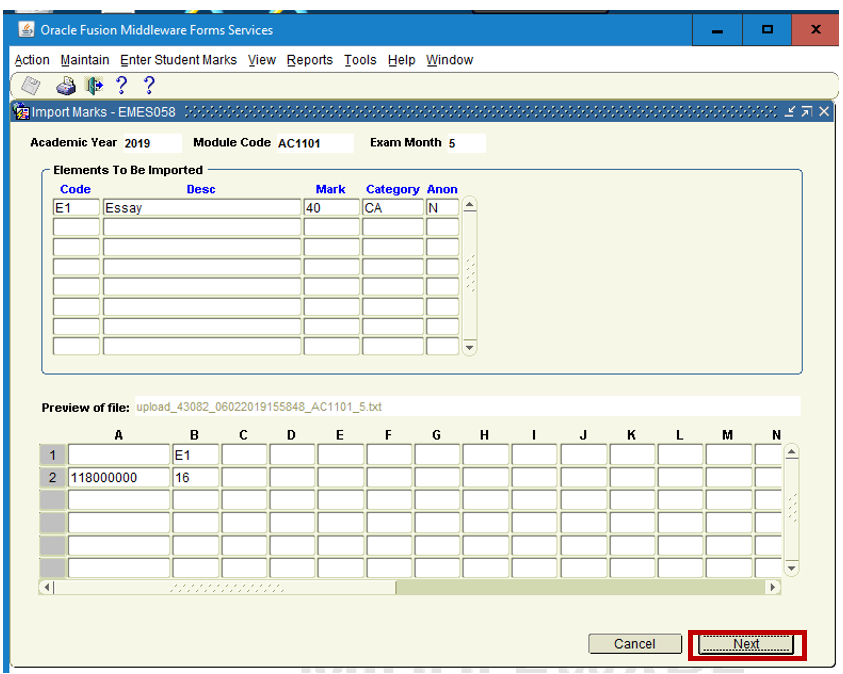
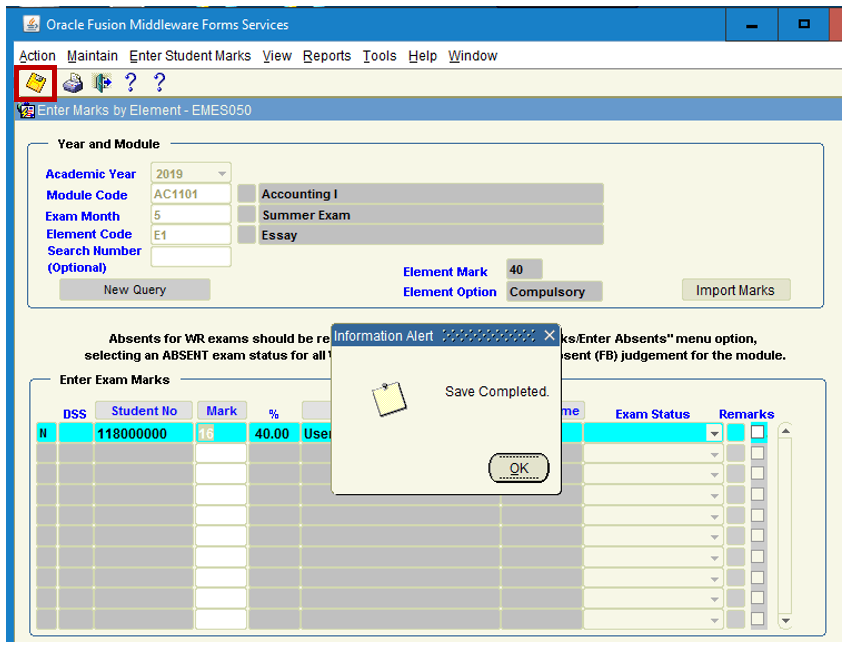
- You are then presented with a Confirmation Screen of the Marks that are about to be record.
- Click the Save Button to Finalise the Importing of the Marks.
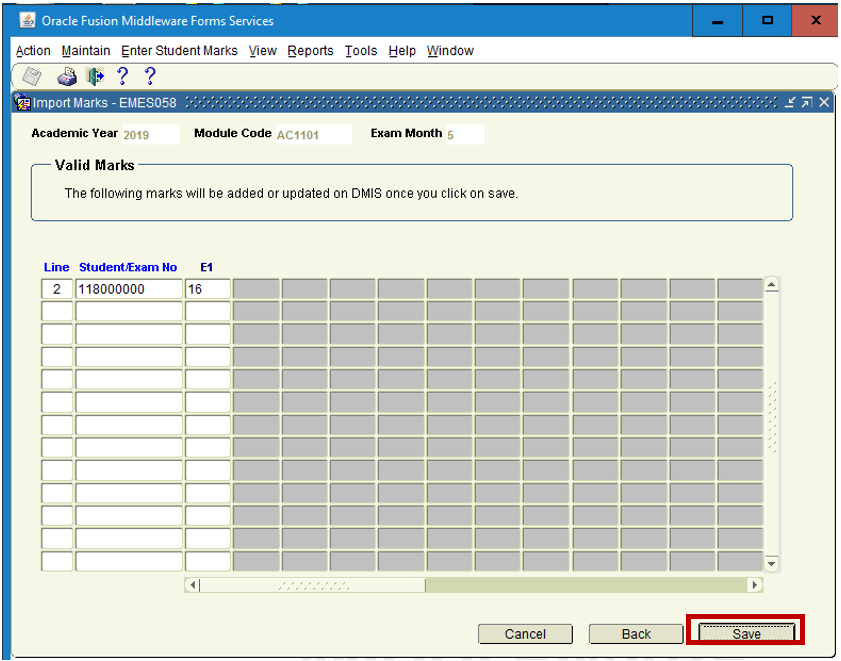
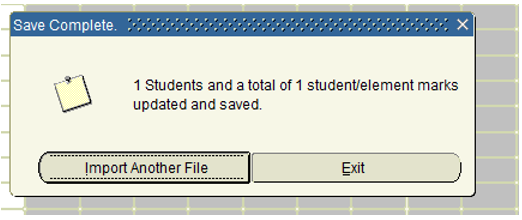
- You will be presented with Save Complete Message which confirms how many students and marks have been updated and saved.
OPTION 2 – WITHOUT ELEMENT CODE:

- The structure of the Mark TEXT File is very straight forward.
- Format:
- Line 1 – Type the Student Number
- Line 1 – Tab in 1 Space.
- Line 1 – Type the Result Value
- Line 2 – Type the Student Number
- Line 2 – Tab in 1 Space.
- Line 2 – Type the Result Value
- Save your file on OneDrive on Office 365.
- Once your file is created and ready to be imported into DMIS, go to:
Enter Student Marks – By Student List / Element.

- Enter the Academic Year + Module Code + Exam Month + Element Code, and click Show Students.
- Once your input values are correct, you will be presented back the list of students in the module.
NB - You will also be presented with a New Button named Import Marks.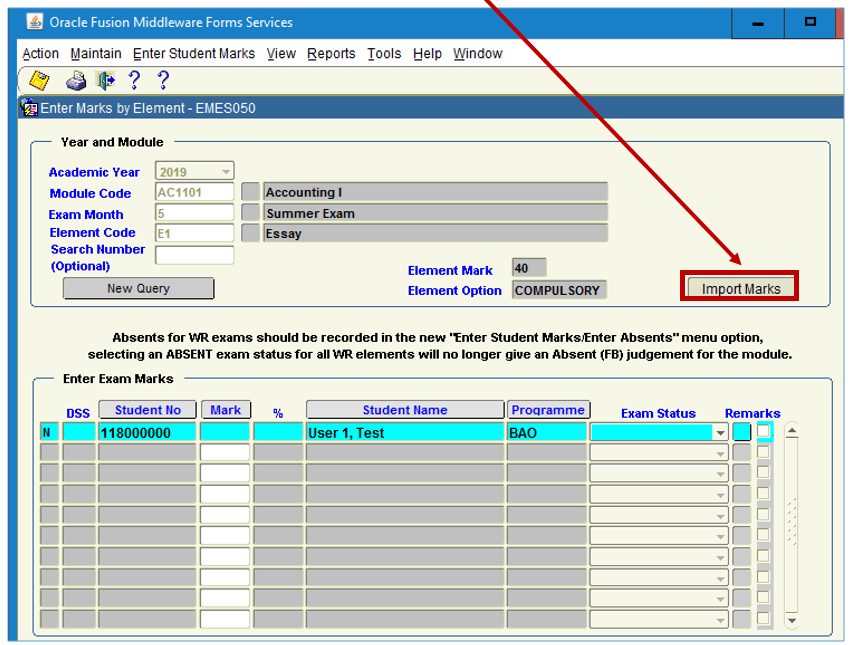
- Clicking the Import Marks button will present you with the Upload / Browse screen.
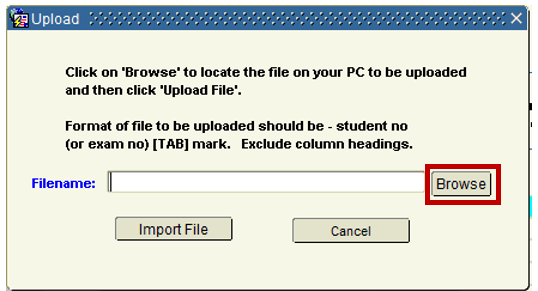
- Browse to Onedrive for Business to locate your file, and click Open to Upload.
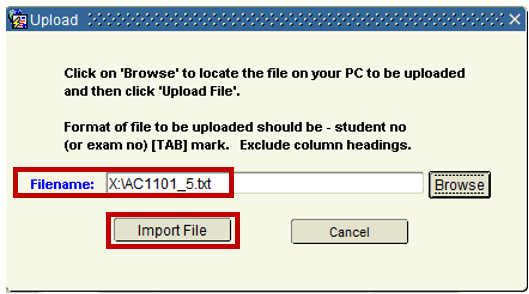
- Once the File Name is presented to you in the Filename field, click the Import File Button.
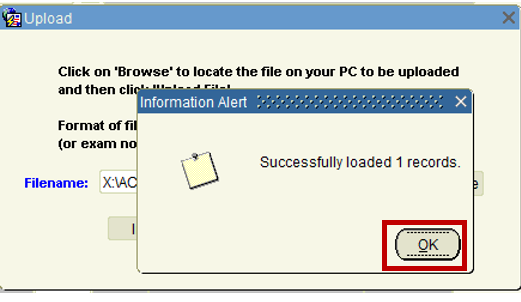
- Upon successful upload, a message will be presented which states how many records have been successfully loaded.
Click OK to this message.
- The student list and Marks will be presented to you.
- Click the Save button to complete the Mark Import.
Academic Systems Administration Office
Contact us
2nd Floor, West Wing, Main Quadrangle, University College Cork (UCC), Western Road, Cork