MiniNAM: A Network Animator for Mininet
MiniNAM: A Network Animator for Visualizing Real-Time Packet Flows in Mininet
We kindly ask that should you mention MiniNAM, or use our code, in your publication, that you would reference the following paper:
Ahmed Khalid, Jason J. Quinlan, Cormac J. Sreenan, "MiniNAM: A network animator for visualizing real-time packet flows in Mininet". In 20th Conference on Innovations in Clouds, Internet and Networks (ICIN), March 2017.
We present MiniNAM, a utility that provides real-time animation of any network created by the Mininet emulator. Mininet is capable of emulating both traditional and software defined networks, however it does not provide a tool to visually observe and monitor the packets flowing over the created network topology. Our utility includes all the components required to initiate, visualize and modify Mininet network flows in real-time.
MiniNAM provides a graphical user interface that allows dynamic modification of preferences and packet filters: a user can view selective flows with options to color code packets based on packet type and/or nodes (hosts). This establishes MiniNAM as a very powerful tool for debugging network protocols or teaching, learning and understanding network concepts.
Teachers can use MiniNAM to animate networking principles in class or within a lab scenario. Students can use MiniNAM to compare and understand network protocols. MiniNAM has been used in undergraduate networking labs in University College Cork (UCC) and University of California, Riverside (UCR). Researchers can use MiniNAM to investigate new networking concepts, debug real-life network applications, and do more advanced comparisons by using the network interface. MiniNAM was used in D-LiTE-ful, a testbed to show real-time video streaming.
To show how to use MiniNAM, we will work through a tutorial that demonstrates how to set up MiniNAM, use MiniNAM to build a network, configure various display parameters or packet filters, generate network traffic and visualize packet flows in real-time. We have also included three distinct network examples that provide a glimpse of what MiniNAM can do. We have made a video demonstration/tutorial for each of these examples. These videos are a good starting point to learn how to use MiniNAM.
The current build of the source code of MiniNAM is available on GitHub, along with examples.
Set Up MiniNAM
You should already be familiar with Mininet before trying to use MiniNAM. You can go through a very helpful getting started documentation provided by Mininet.
MiniNAM is a graphical user interface (GUI) tool written with Tkinter and Mininet's Python API. This means that it requires a DISPLAY environment to run. If you are using Mininet VM via SSH then make sure to have X forwarding enabled. You can find how to do that in Mininet FAQ section.
MiniNAM has no additional dependencies and if you have Mininet installed in your machine then MiniNAM should work fine too. Any network that can be created using mn utility of Mininet can also be created with MiniNAM. You can find the source code of MiniNAM here. Make sure to have Tkinter imaging installed for python:
$ sudo apt-get install python-imagingDepending on your version of linux, you may need to install Tkinter using this call instead:
$ sudo apt-get install python-imaging-tkThere are three ways to run MiniNAM.
- Start MiniNAM from CLI with a single command
- Start MiniNAM from CLI and pass custom files
- Import MiniNAM in your code and create an instance (Example coming soon)
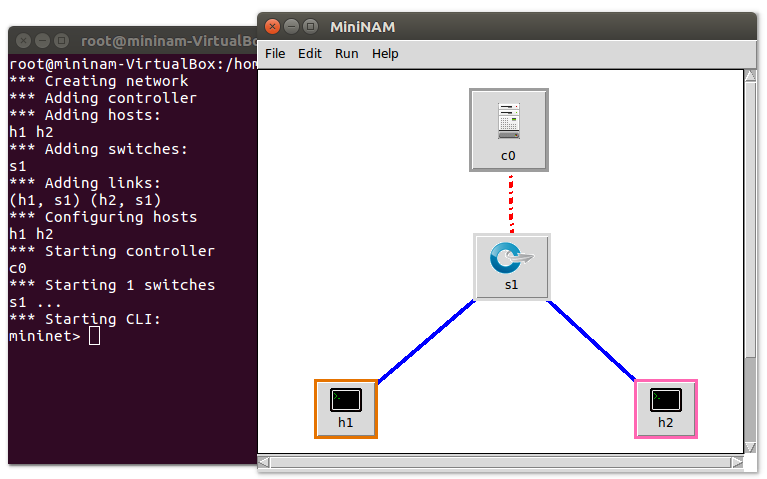
Start MiniNAM With a Single Command
Mininet needs root privileges to create a network, so MiniNAM should also run with root privileges when creating a network. Open a terminal in the directory where you have MiniNAM code and run:
$ sudo python MiniNAM.pyThis will create a minimal topology and load a window with two hosts and one switch. At loading, MiniNAM places nodes randomly but you can drag around nodes in the window to get your preferred topological view.
To make MiniNAM easier for Mininet users, arguments of MiniNAM have been kept the same as Mininet. This means that all the arguments that can be passed to mn utility can be passed to MiniNAM too. A list of these arguments can be seen in help:
$ sudo python MiniNAM.py --helpAs an example, a network with remote controller and a tree topology with depth=2 and fanout=2 can be created with this command:
$ sudo python MiniNAM.py --topo tree,depth=2,fanout=2 --controller remotePass custom files to MiniNAM
To load a custom topology using MiniNAM, --custom argument can be used to load a custom file and then --topo argument can be used to load a custom topology from that file. Similarly custom switches or tests can also be loaded. This is shown in the NAT example where a custom topology is loaded from a custom file.
$ sudo python MiniNAM.py --custom goodNAT.py --topo mytopoMiniNAM can also load a network (Mininet instance) from a custom script. This can be done by:
$ sudo python MiniNAM.py --custom netThe name of the network instance in your script must be net in upper or lower case. One important thing to note when using custom files is that MiniNAM will ignore any run or start function in the custom Mininet file unless you are loading the whole network. This is because Mininet allows only one network instance at a time and if --net argument is not used, MiniNAM will create its own Mininet instance, ignoring the one in your custom script. Therefore you should define any desired network functionality for nodes, in the topology section of your custom file or when defining a node. As an example take a look at the files in NAT example where NAT rules are installed in the router on its initialization.
Set Up Preferences and Filters
Preferences
To set preferences for the network and display of network flows, use the MiniNAM menu command, Edit → Preferences. In the dialogue box that appears, make the changes you need.
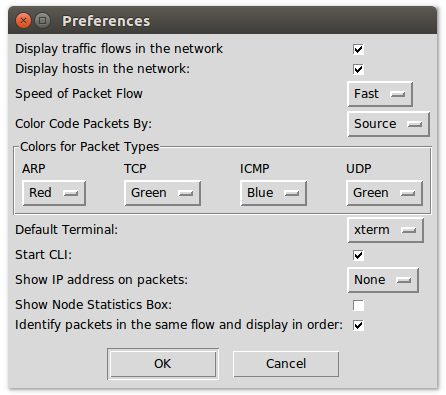
A brief description of what these options mean is below:
Display Traffic Flows in the Network: If you only want to see the network topology and not the flows, you can uncheck this option.
Display Hosts in the Network: If there are too many nodes in the network and you do not wish to see the hosts, select this option. For now this is a one-time option only i.e. after the inital startup, hosts will remain hidden or displayed. So if you want to use this option then pass a config file as a parameter to MiniNAM with this option set to 1.
Speed of Packet Flow: This option can be used to slow down the display speed at which packets are flowing over the network links. If set to Real Time packets will be shown in real-time. As this speed can be very fast to monitor or analyze the packet flows, a controlled speed can be used to better analyze the flows.
Color Code Packets by Node: This option can be used to have a different color for packets based on the source or destination node (host).
Colors for Packet Types: If this option is selected, in addition to the color of source node, an extra color will be added to packets based on their packet type.
Start CLI: All the actions that CLI provide can be done via the MiniNAM GUI. However if you want to use CLI then select this option and a CLI will start in the main terminal. Note that exiting this CLI will not stop the network but only exit the CLI. To stop the network you will have to close the MiniNAM GUI.
Show IP Address on packets: If selected, first and last octet of source or destination IP will be displayed on every packet.
Show Node Statistics Box: This option can be used to show a statistics box with each node on mouse hover over that node.
Identify Packets in the Same Flow and Display in Order: This option can be used when packets are not displayed in real-time speed. In such cases, as there can be more than one flow in the network at a particular time, MiniNAM tries to identify packets that belong to the same flow and adds those packets to a separate FIFO queue for each flow. In this way those packets are displayed one after another, providing a more representable view. By default, MiniNAM uses packet type, source and destination address to identify flows. This should work for most legacy protocols such as pings, iperf etc. However if flows in your protocol or network do not just rely on IP addresses, you can modify the flow identification process of MiniNAM by modifying the getQueue() function, to suit your needs.
Filters
To apply filters to the packets that will be displayed, use the MiniNAM menu command, Edit → Filters. In the dialogue box that appears, make the changes you need.
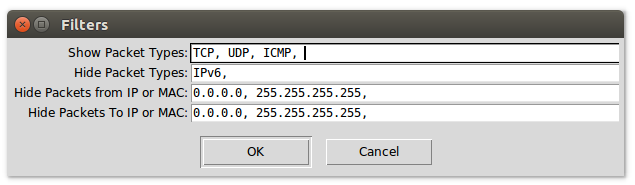
A brief description of filter options is given below:
Show Packet Types: Here you can specify packet or frame types that you want to be displayed. If you want to see all packets/frames then use keyword ALL. Entries in this field must be in form of a comma separated list.
Hide Packet Types: Here you can specify packet or frame types that you do not want to be displayed. You can use this option if you do not want to see a subset of a certain type, e.g. you want to see IP packets but not IPv6. Note that hiding packets has higher priority than showing packets. This means that if a same entry is given both in Show Packets and Hide Packets field, it will NOT be displayed. Entries in this field must be in form of a comma separated list.
Hide Packets From IP or MAC: If you do not want to see packets from a certain source node, you can specify its IP or MAC address here. Entries in this field must be in form of a comma separated list.
Hide Packets To IP or MAC: If you do not want to see packets from a certain destination node, you can specify its IP or MAC address here. Entries in this field must be in form of a comma separated list.
Saving and Loading Preferences/Filters
Use the MiniNAM menu command, File→ Save Prefs. to save your preferences and filter options as a config file. This configuration file can later be loaded using the menu command, File→ Load Prefs. The config file can be loaded for any emulation started with MiniNAM.
Experiment with the network
After preferences and filters have been set, you can perform various experiments by generating traffic and visualizing the traffic over relevant links.
Run programs to generate and monitor traffic
MiniNAM allows opening an xterm window on hosts. Right-click on each host in the MiniEdit GUI and select Terminal from the menu that appears. In the xterm window, run a ping or iperf command to send traffic between hosts. Pings or Iperfs can also be generated using console window if you are using CLI. You will see the generated traffic flowing over the network links, according to your preferences and filters. In case of ping you can see ICMP packets travelling from one host to another and a response going back.
You will see packets with color of the source node and blue color (default) to represent ICMP packets. Similarly for iperf you will see TCP packets with green color (default) travelling over the relevant links. These preferences can be modified in run-time using the menu command Preferences or Filters, as described in the previous section.
Pause or Clear Flows
Use MiniNAM menu command Run→ Pause to pause the flow of traffic at a particular time and then Run→ Resume to resume from the same point.
If you are monitoring the flows at a slower than real-time speed, and you want to discard the flows that have already been generated, you can use menu command Run→ Clear, which will discard all the existing flows that were waiting to be displayed. Now you can generate some new flows and monitor them without any hold-up.
Simulate a Broken Link
To simulate a broken link in the network, move the mouse pointer over one of the blue links in the network and right-click. Choose Link Down from the menu that appears. The link will turn into a dashed blue line, indicating it is down. Now if you generate traffic that has to pass through that link. You will observe that it will be unable to pass through and any response will not be received by the nodes on the other side of that link.
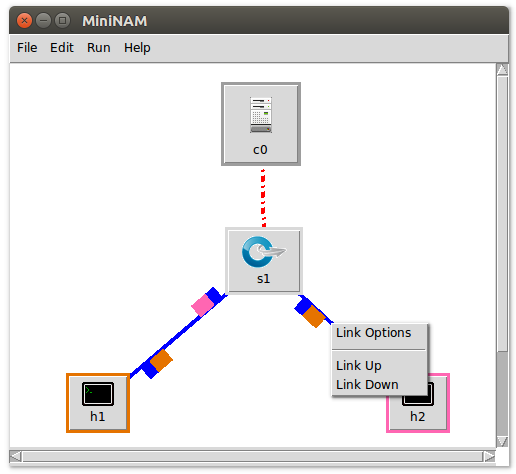
Right-click on the link again and choose Link Up from the menu to bring the link back up. No Link Down option is provided for control links. Refer to the Routing Example for visualizing this phenomenon in action.
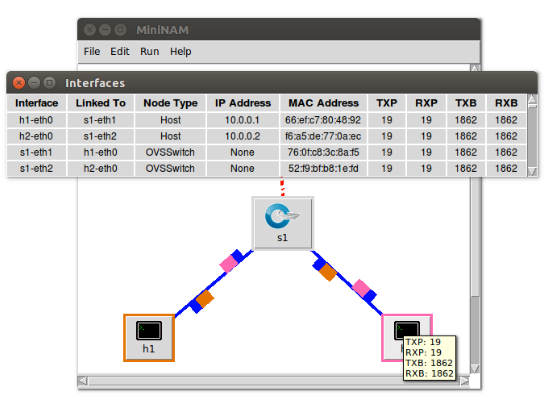
Check Node/Interface Statistics
To check the number of transmitted/received packets or bytes from any node, simply move the mouse pointer over that node. If you want to see more detailed statistics of every interface in the network, you can do that by using menu command Run → Show Interfaces Summary.
>
Examples of using MiniNAM to Visualize Mininet Networks
We provide three distinct network protocol examples to illustrate the usage of MiniNAM. These three examples are:
- LOAD BALANCER: This example uses Ryu SDN controller to implement Server Load Balancing. This example is a part of Open-State SDN Project.
- NAT: This example uses the simple linuxrouter example provided in Mininet to create a network with one NAT-enabled router connected to three switches.
- ROUTING: Taken from Spanning Tree in Ryu conrtoller, this example creates a network with multiple paths between hosts. If a path is broken, the controller tries and updates the path, if possible.
For each example, two cases are provided. One with good and correctly working code and the other with some faulty logic. The good case demonstrates how MiniNAM can help in understanding or analyzing network concepts. The bad case shows how MiniNAM can be useful in debugging faulty network protocols.
Setting Up Examples
The easiest way to set up these examples is to download and use the pre-configured VM which includes all the tools and dependencies required to run these examples. (A link will be provided soon.)
To manually set up the examples, follow the instructions below:
- Make sure you have Mininet installed on your machine.
- Download and install Ryu SDN controller.
- OpenState is needed for Load Balancing example. OpenState can be installed using this command:
$ bash -c "$(wget -O - http://openstate-sdn.org/install.sh) - Clone MiniNAM repository. It includes all our files that we use in these examples.
$ git clone git://github.com/uccmisl/MiniNAM - Install paping that allows to ping specific ports. The paping binary is included in MiniNAM/Examples/LoadBalancer directory. Just set permissions for it:
$ sudo chmod +x paping - Files goodNAT.py and badNAT.py in MiniNAM/Examples/NAT directory will be used to create networks for NAT example.
- The spanning_tree.py file in MiniNAM/Examples/Routing directory is for creating network for Routing example.
- The simple_switch_stp_13.py file in MiniNAM/Examples/Routing directory is the controller app for Routing example. Place it in ryu app directory (/ryu/ryu/app/).
- You are all set. If you encounter any problems, you can always go through the webpages of Server Load Balancing or Spanning Tree Routing examples.
Running Examples
LOAD BALANCER
- Launch server load balancing controller application in Mininet by typing the following command:
$ ryu-manager ~/ryu/ryu/app/openstate/forwarding_consistency_1_to_many.py - cd to the LoadBalancer directory (MiniNAM/Examples/LoadBalancer in the provided VM). Start MiniNAM with a single topology with 4 hosts:
$ sudo python MiniNAM.py --topo single,4 --mac --switch ovsk --controller remote - Open terminals for h1, h2, h3, h4 by right-clicking them and clicking on 'Open Terminal'.
- Write inside the terminals of h2, h3 and h4 the following commands to start the Echo Servers:
h2# python ~/ryu/ryu/app/openstate/echo_server.py 200 h3# python ~/ryu/ryu/app/openstate/echo_server.py 300 h4# python ~/ryu/ryu/app/openstate/echo_server.py 400 - Open terminal for h1 by right-clicking on it. Enter the following command:
h1# ./paping 10.0.0.2 -p 80 -c 20 - To check how many packets a certain server/node has sent or received, just hover the mouse over that node. Full statistics of all interfaces can also be seen by using 'Show interface Summary' in the Run menu.
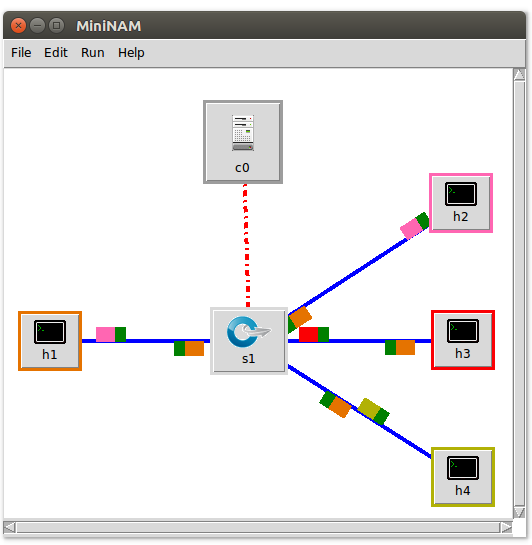
The traffic from three servers (h2,h3,h4) can be viewed in different colors traveling towards the client.
NAT
- Go to the NAT directory in MiniNAM/Examples.
- Start MiniNAM with custom topology using goodNAT.py or badNAT.py:
$ sudo python MiniNAM.py --config conf.config --custom goodNAT.py --topo mytopo $ sudo python MiniNAM.py --config conf.config --custom badNAT.py --topo mytopo - To observe NAT, it is a good idea to look at the IP address of packets and view it change when crossing the router. conf.config file loads this option. To change preferences go to Preferences in the Edit menu.
- Open terminal for h1 by right-clicking its icon and clicking on 'Open Terminal'.
- Send some pings to h3 from h1:
h1# ping 10.0.0.100 -c 3 - ICMP packets can be observed travelling from h1 to h3 and the IP address changing at the router.
- For badNAT.py the forwarding rule is not installed correctly and hence packets will be unable to pass through the router.
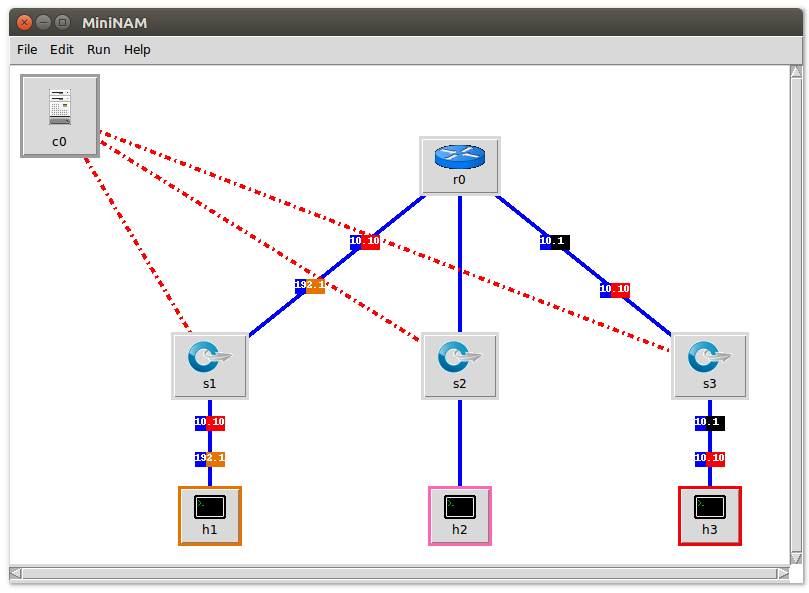
The change in IP address of packets can be seen once a packet crosses router r0.
ROUTING
- Start the controller as follows:
$ ryu-manager ~/ryu/ryu/app/simple_switch_stp_13.py - To see the behavior where routing will not work due to loop, you can run a simple switch:
$ ryu-manager ~/ryu/ryu/app/simple_switch_13.py - Open a terminal in MiniNAM/Examples/Routing/
- Start MiniNAM with custom topology using spanning_tree.py and the remote controller:
$ sudo python MiniNAM --custom spanning_tree.py --topo mytopo --controller remote - Configure Preferences in the Edit menu as desired.
- Open terminal for h1 by right-clicking its icon and clicking on 'Open Terminal'.
- Send some pings to h2 from h1:
h1# ping 10.0.0.2 -c 5 - ICMP packets can be observed travelling from h1 to h2 through the shortest path. (Once the controller is configured which can take a while.)
- Now right-click on the link between s1 and s2 and click on Link Down to simulate a broken link. The controller will re-configure switches to update the path.
- Send some pings to h2 from h1 and you can observe ICMP packets flowing through the alternate path.
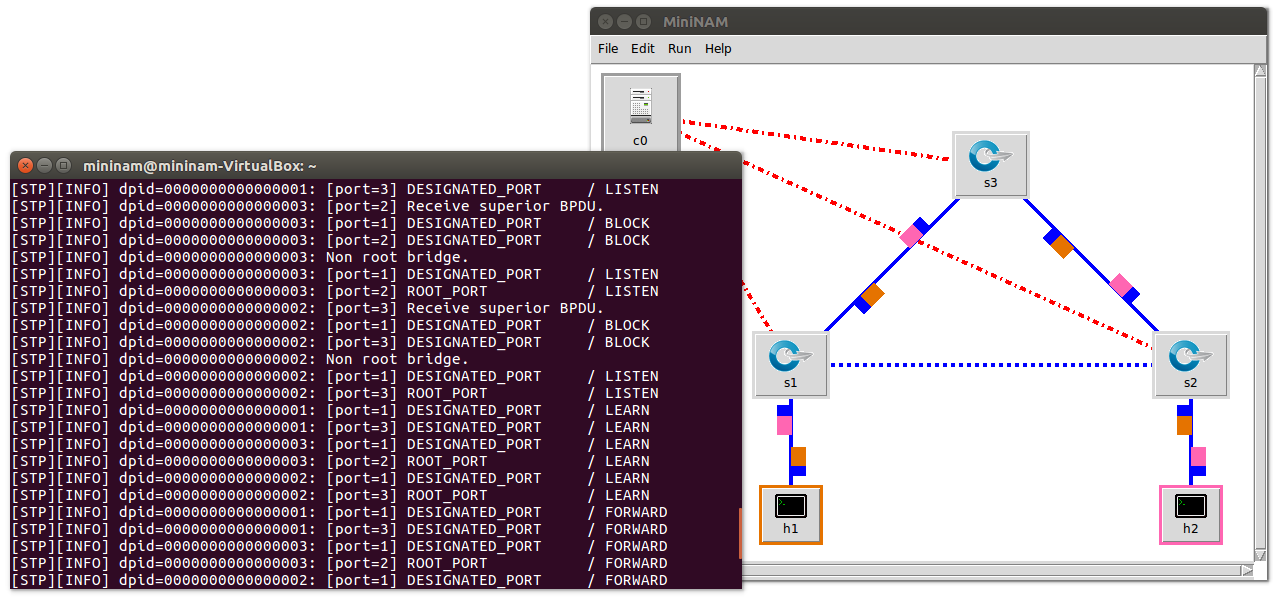
A broken data link (shown in dotted) results in packets following a different route (s1-s3-s2).
Last update: Tues 7th Nov 2017
Mail any comments or suggestions to Ahmed Khalid

Video Demos/Tutorials
Mobile and Internet Systems Laboratory
Contact us
Department of Computer Science, Western Gateway Building, University College Cork, Western Road, Cork, Ireland.