Ensure a Safe Teams Meeting Experience
Running a Safe Teams Meeting
To ensure a safe and enjoyable teams meeting, or online teaching experience, it is useful to understand the following settings available to Teams Meeting Organisers. Using some, or all, of the settings detailed below will help you ensure a safe meeting or online class.
On this page
Standard meeting permissions
When you schedule a Teams meeting these are the default permissions that your meeting attendees will have:
| Permission | Meeting Organiser | UCC Staff or Student Attendee | Guest Attendee |
|---|---|---|---|
| Share audio and video | Yes | Yes | Yes |
| Participate in the meeting chat | Yes | Yes | Yes |
| Share their screen | Yes | Yes | No |
| Unmute their mic | Yes | Yes | Yes |
| Mute other participants | Yes | Yes | No |
| Prevent attendees from unmuting themselves | Yes | Yes | No |
| Remove participants | Yes | Yes | No |
| Admit people from the lobby | Yes | Yes | No |
| Change the roles of other participants | Yes | Yes | No |
| Start or stop recording | Yes | Yes | No |
| Privately view a PowerPoint file shared by another attendee during the meeting | Yes | Yes | Yes |
| Ask to take control of someone else's PowerPoint presentation | Yes | Yes | No |
This applies for meetings created through Teams, Outlook or with the Teams Canvas plugin.
Controlling who can do what in your Teams Meeting
When organizing a Teams meeting, you can assign optional meeting roles to determine meeting permissions.
As a meeting organiser, before or during your meeting, open the Meeting Options menu to change these settings:
Where to find Meeting Options During a Meeting
- Click the ellipsis (three dots) in the menu bar
- Select Meeting Options from the menu that displays

Maximum Control
For maximum control of your meeting, choose the following settings:
- Who can bypass the lobby? – Only me
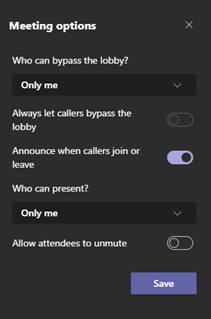
- With this option attendees will be held in the lobby until you or another UCC attendee admit them.
- Who can present? – Only me
- Others on the call cannot share their screen unless you make them a presenter.
- Allow attendees to unmute – disabled
- Attendees cannot unmute their mic unless you give them permission individually from the participants list
Control who can unmute during a meeting
By default, all participants can unmute their mic during a meeting, unless you have deactivated this in the meeting options.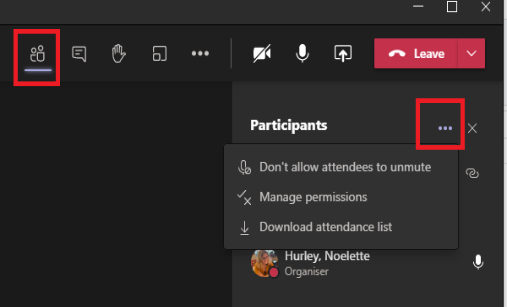
- During the meeting, you can also prevent students from unmuting their mic, by clicking the Participants tab and selecting the ellipsis button for More Options
- To stop students from unmuting their Mic, select: Don’t Allow attendees to unmute
- To allow students to unmute themselves again, set it to Allow attendees to unmute (This is the default setting)
- You can ask students to use the Raise hand function to ask a question. To allow a student to speak or present their screen during the meeting, you can upgrade their permissions by
- Clicking on the participants button in the call menu
- Scroll to find the name of the user
- Click the Ellipsis button next to their username
- Select Make a Presenter
How can a guest attendee share their screen during our meeting?
To allow a guest attendee to share their screen, you should:
- Open the Participants tab in the meeting menu.

- Scroll to find the name of the guest attendee and click the ellipsis (three dots) next to their name.
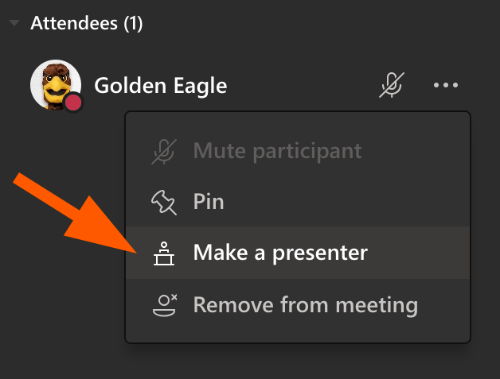
- Select Make a Presenter. This will give the guest permission to share their screen.
- You can remove this permission by repeating the steps and selecting Make an Attendee.
End the meeting for all participants
If you are a meeting organiser you have the option of ending a meeting for everyone.
This is a great way to make sure that your microphone and camera are no longer being shared with participants.
This also ensures that students don't remain in your virtual classroom after you have left.
To end a meeting:
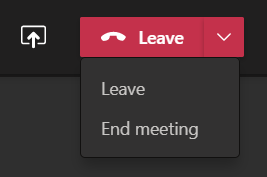
- Select the down arrow next to Leave meeting button
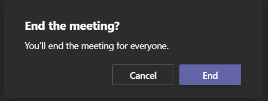
- You'll be asked to confirm that you wish to end the meeting.
- When you do, the meeting will end for everyone right away.

